5 Common Mistakes Beginners Make in Vertical Farming (And How to Avoid Them)
Learn from others’ errors — skip the learning curve and start growing successfully from day one
Introduction: Why Beginners Fail
Vertical farming looks simple. Put seeds in water, add lights, wait for harvest. But the reality is more complex.
Most beginners make the same mistakes. The good news? They’re all avoidable. This guide covers the five most common errors and exactly how to prevent them.
The 5 mistakes we’ll cover:
- Overwatering and drowning roots
- Insufficient or incorrect lighting
- Nutrient mismanagement
- Poor air circulation
- Ignoring pH and EC monitoring
Let’s dive in.
Mistake #1: Overwatering and Drowning Roots
What Happens
New growers often think “more water = more growth.” In hydroponics and vertical farming, the opposite is true. Roots need oxygen as much as they need water.
When roots sit in stagnant water without oxygen:
- They turn brown and slimy (root rot)
- Plants stop growing
- Leaves turn yellow
- Eventually, plants die
Why Beginners Do This
- Fear of plants drying out
- Not understanding how hydroponic systems work
- Leaving pumps running 24/7 in systems designed for intermittent flow
- Using solid growing medium that stays too wet
How to Avoid It
| Solution | How to Implement |
|---|---|
| Understand your system | NFT needs thin film (1-2cm depth); DWC needs air stones; aeroponics needs misting cycles |
| Use timers | Run pumps 15-30 minutes on, 30-60 minutes off (depends on system) |
| Check root color weekly | White/cream = healthy; brown = problem |
| Use proper growing medium | Rockwool, coco coir, or clay pebbles (not soil) |
| Add air stones | Increases oxygen in nutrient solution |
The Golden Rule: Roots should feel damp, not soaking wet. If water drips when you squeeze the growing medium, it’s too wet.
Signs You’re Overwatering
- Roots are brown or black
- Slimy texture on roots
- Foul smell from reservoir
- Wilting despite plenty of water
- Algae growing on medium surface
Quick Fix
- Reduce pump running time (add more off cycles)
- Add air stones to increase oxygen
- If root rot has started, add beneficial bacteria (Hydrogen peroxide or commercial product)
- Remove severely affected plants
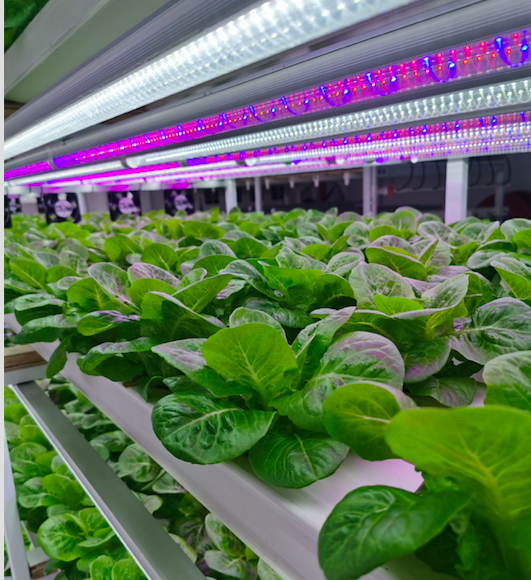
Mistake #2: Insufficient or Incorrect Lighting
What Happens
Plants stretch toward light, become weak and leggy, produce small leaves, and yield poorly. Or worse — leaves bleach and burn from too much light.
Why Beginners Do This
- Buying cheap “grow lights” from Amazon that don’t deliver advertised PAR
- Placing lights too far from plants
- Not understanding PPFD requirements for different crops
- Using regular LED shop lights (wrong spectrum)
- Running lights 24/7 (no dark period)
How to Avoid It
Step 1: Buy the right lights
| Light Type | Recommended? | Why |
|---|---|---|
| Full-spectrum LED | ✅ Yes | Energy efficient, right spectrum |
| Quantum board LEDs | ✅ Yes | Best efficiency, uniform coverage |
| Purple “blurple” LEDs | ⚠️ Caution | Hard to inspect plants, eye strain |
| Regular LED shop lights | ❌ No | Wrong spectrum, low PAR |
| Fluorescent tubes | ❌ No | Low efficiency, high heat |
Step 2: Match PPFD to your crops
| Crop Type | PPFD (µmol/m²/s) | Light Height |
|---|---|---|
| Seedlings | 100-200 | 60-80 cm |
| Leafy greens | 200-400 | 40-60 cm |
| Herbs | 200-350 | 40-60 cm |
| Fruiting crops | 400-600 | 30-50 cm |
Step 3: Set correct photoperiod
| Crop Type | Light Hours | Dark Hours |
|---|---|---|
| Leafy greens | 16-18 | 6-8 |
| Herbs | 16 | 8 |
| Fruiting crops | 12-14 | 10-12 |
Step 4: Measure, don’t guess
Buy or borrow a PAR meter. Phone apps are better than nothing but not accurate.
Signs of Lighting Problems
| Too Little Light | Too Much Light |
|---|---|
| Leggy, stretched stems | Bleached white/yellow leaves |
| Small leaves | Curled leaf edges |
| Slow growth | Purple stems (stress response) |
| Plants leaning toward light | Leaf burn |
Quick Fix
- Too little light: Lower lights, add more fixtures, or increase photoperiod
- Too much light: Raise lights, dim, or reduce photoperiod
Mistake #3: Nutrient Mismanagement
What Happens
Plants show yellow leaves (nitrogen deficiency), brown leaf tips (nutrient burn), or stunted growth (general imbalance).
Why Beginners Do This
- Using wrong nutrient formula (soil nutrients in hydroponics)
- Mixing nutrients in wrong order (causing precipitation)
- Never changing reservoir water
- Guessing instead of measuring
- Using tap water without testing
How to Avoid It
Step 1: Use hydroponic-specific nutrients
| Crop Type | Recommended N-P-K Ratio |
|---|---|
| Leafy greens | 7-9-5 or similar |
| Herbs | 5-5-5 or similar |
| Fruiting crops | 5-10-10 or similar (higher P and K) |
Step 2: Mix nutrients correctly — always in this order
- Start with clean water (RO or dechlorinated tap)
- Add part A (calcium-based) — mix well
- Add part B (nitrate-based) — mix well
- Add part C (micronutrients) — mix well
- Never mix A and B together before adding to water
Step 3: Follow EC targets by growth stage
| Growth Stage | EC (mS/cm) |
|---|---|
| Germination | 0.5-0.8 |
| Seedling | 0.8-1.2 |
| Vegetative | 1.2-1.8 |
| Fruiting/flowering | 1.8-2.5 |
Step 4: Change nutrient solution weekly
Don’t just top off. Old water accumulates salts and can harbor pathogens.
Step 5: Use the right water
| Water Type | OK? | Notes |
|---|---|---|
| RO water | ✅ Best | Start with 0 EC |
| Distilled | ✅ Good | Expensive for large systems |
| Tap water | ⚠️ Depends | Test first — high chlorine or hardness causes problems |
| Well water | ⚠️ Caution | Test for iron, sulfur, bacteria |
Signs of Nutrient Problems
| Symptom | Deficiency | Excess |
|---|---|---|
| Yellow lower leaves | Nitrogen | – |
| Brown leaf tips | – | Nutrient burn (EC too high) |
| Purple stems | Phosphorus (or cold) | – |
| Curled new leaves | Calcium | – |
| Dark green leaves | – | Nitrogen (too much) |
Quick Fix
- Low EC (below target): Add nutrients in correct order
- High EC (above target): Add plain pH-adjusted water to dilute
- pH out of range: See Mistake #5 below
Mistake #4: Poor Air Circulation
What Happens
Stagnant air leads to:
- Mold and mildew on leaves
- Weak, thin stems
- Pest outbreaks (spider mites, aphids)
- Uneven growth across the growing area
Why Beginners Do This
- Focusing only on lights and water, forgetting air
- Thinking small grow spaces don’t need fans
- Placing fans pointing directly at plants (wind burn)
- No intake or exhaust for fresh air exchange
How to Avoid It
Three types of air movement you need:
| Type | Purpose | Implementation |
|---|---|---|
| Oscillating fans | Strengthen stems, prevent mold | 1-2 fans per rack, gentle breeze |
| Exhaust fan | Remove heat and humidity | Run when temp/humidity exceed setpoints |
| Intake vent | Bring in fresh CO₂ | Passive vent or active fan |
Setup guidelines:
- Place oscillating fans above canopy, angled slightly down
- Air should move leaves gently (not violently shaking)
- Position fans to create circular air pattern
- Run fans 24/7 (plants need constant air movement)
CO₂ considerations:
- Normal air has ~400-450 ppm CO₂ — enough for most setups
- Sealed rooms may need CO₂ supplementation
- Good air exchange from outdoors is usually sufficient for small farms
Signs of Poor Air Circulation
- White powdery spots on leaves (powdery mildew)
- Mold on growing medium surface
- Weak, thin stems that flop over
- Fungus gnats (they love stagnant air)
- Hot spots in grow area
Quick Fix
- Add oscillating fans — one per 4-6 square meters
- Ensure air moves across and under canopy
- Install exhaust fan to remove hot, humid air
- Open intake vent to bring in fresh air
Mistake #5: Ignoring pH and EC Monitoring
What Happens
Plants show multiple deficiency symptoms at once. You add more nutrients, but nothing helps. The problem isn’t missing nutrients — it’s that plants can’t access the nutrients you’re giving them.
Why Beginners Do This
- Don’t own a pH or EC meter
- Assume tap water is fine
- Think “close enough” is good enough
- Calibrate meters once and never again
How to Avoid It
Understand what pH and EC do:
| Parameter | What It Measures | Ideal Range | Why It Matters |
|---|---|---|---|
| pH | Acidity/alkalinity | 5.5-6.5 | Affects nutrient availability |
| EC | Nutrient concentration | 0.5-2.5 (varies by crop) | Tells you if plants are getting enough food |
The pH Nutrient Availability Chart:
At the wrong pH, nutrients become “locked out” — present in water but unavailable to plants.
| pH Range | Effect |
|---|---|
| Below 5.0 | Calcium, magnesium deficiency |
| 5.5-6.5 | Optimal — all nutrients available |
| Above 6.8 | Iron, manganese, phosphorus deficiency |
Daily monitoring routine:
| Task | Tool | Target |
|---|---|---|
| Check pH | pH meter or test strips | 5.5-6.5 |
| Check EC | EC/TDS meter | Follow crop guide |
| Log readings | Notebook or app | Track trends |
Equipment you need:
| Tool | Budget | Why You Need It |
|---|---|---|
| pH meter | $30-100 | Essential — don’t guess |
| EC meter | $20-80 | Essential — don’t guess |
| Calibration solutions | $10-20 | For both meters, monthly |
| pH up/down | $15-25 | To adjust pH |
Signs You’re Ignoring pH/EC
- Multiple deficiency symptoms at once
- Adding nutrients doesn’t help
- EC readings suddenly spike or drop
- Plants look unhealthy despite perfect temperature and light
Quick Fix
If pH is too high (above 6.5):
- Add pH down (phosphoric or citric acid)
- Add slowly (1ml per 10L), wait 10 minutes, re-test
If pH is too low (below 5.5):
- Add pH up (potassium hydroxide)
- Add slowly, wait, re-test
If EC is too high:
- Add plain pH-adjusted water to dilute
- Check for water evaporation (top off first, then test)
If EC is too low:
- Add more nutrient solution
- Mix according to instructions, add slowly
Bonus: The Beginner’s Weekly Checklist
Print this and post it in your grow room.
| Day | Task | Notes |
|---|---|---|
| Daily | Check EC/pH | Adjust as needed |
| Daily | Visual plant inspection | Look for pests, yellowing |
| Daily | Check water level | Top up with pH-adjusted water |
| Daily | Check lights and fans | Ensure all running |
| Weekly | Change nutrient solution | Complete replace |
| Weekly | Clean reservoir | Wipe down, remove debris |
| Weekly | Calibrate meters | pH and EC |
| Weekly | Check roots | White = healthy |
| Weekly | Remove dead leaves | Prevents mold |
| Monthly | Deep clean system | Flush with cleaning solution |
| Monthly | Clean light fixtures | Remove dust |
| Monthly | Review growth data | Compare to targets |
Summary: How to Avoid All 5 Mistakes
| Mistake | One-Sentence Solution |
|---|---|
| Overwatering | Roots need oxygen — use pump timers and check root color weekly |
| Bad lighting | Buy full-spectrum LEDs, measure PPFD, and match to your crop |
| Nutrient issues | Use hydroponic nutrients, mix in correct order, follow EC targets |
| Poor air | Add oscillating fans and ensure fresh air exchange |
| Ignoring pH/EC | Buy meters, check daily, keep pH 5.5-6.5 |
Your First 30 Days: A Success Plan
Week 1: Setup
- Assemble system correctly
- Test all equipment (lights, pumps, fans)
- Mix nutrients to seedling strength (EC 0.8-1.2)
- Calibrate pH and EC meters
- Start seeds in proper medium
Week 2: Seedling care
- Maintain 20-22°C, 65-75% humidity
- Keep light at 100-200 PPFD
- Check EC/pH daily
- Watch for first true leaves
Week 3: Early growth
- Increase light to 200-300 PPFD
- Raise EC to 1.2-1.5
- Add oscillating fan for air movement
- Inspect roots weekly
Week 4: Maturation
- Adjust light to crop-specific PPFD
- Maintain EC 1.5-2.0
- Change nutrient solution
- Look for signs of flowering or harvest readiness
Next Steps
Ready to grow successfully?
- Read our Nutrient Management Guide for detailed EC/pH strategies
- Read our PPFD/DLI Complete Guide for light optimization
- Download our Daily Operations Checklist to stay on track